Monday, November 21, 2016

How to Create a Reflection in Photoshop

In this tutorial we will learn how to create a reflection of an object in Photoshop. Reflection is a shadow like the original object. Usually this reflection shadow visible on the surface of the water or the surface of a table made of glass.
Below is the final result of the tutorial makes the shadow of reflection on an object in Photoshop.
reflection photoshop, photoshop tutorial, photo effect

Friday, November 18, 2016

how to make a pencil drawing effects in Photoshop

On this occasion we will learn how to make a pencil drawing effects in Photoshop. Pencil painting effect we can easily create using Adobe Photoshop software. Here is the final result of our tutorial on this post.
pencil drawing effect, photoshop tutorial, photo effect

Thursday, October 29, 2015

create curved text effect in Photoshop

In this tutorial we will create curved text effect in Photoshop. The text of these effects utilize the functionality liquify in photoshop filter and will provide lighting and shading techniques in this tutorial.

Below are the results we get.
text effect in Photoshop, photoshop text effect


Applications: Adobe Photoshop CS6
Duration: 15 minutes


Here are the steps to make the text curved effect.

Wednesday, September 9, 2015

How to create simple 3D text in coreldraw

In this tutorial we will learn how to create simple 3D text in coreldraw.
Create 3D txt in corel draw is easy and simple.
The image below is the final result we will get.
create 3D text coreldraw
create 3D text in CorelDraw

Application: CorelDraw X6
Time : 15 Minutes 


The following steps are to be followed:
Step 1
Open Coreldraw in your Computer.
Create new document.
Activate the Text tool (F8).
Select Franklin Gothic Heavy font with grey fill colour and Black line colour.
create 3D text coreldraw

Step 2
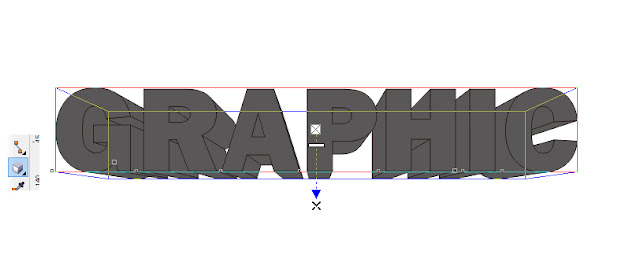
Select Extrude tool.
Drag from the top to bottom of text.
Look at this image below.
create 3D text coreldraw

Choose extrusion type, and we will get this result like this image below.

create 3D text coreldraw


Saturday, September 5, 2015

create a double exposure effect in photoshop

In this tutorial we will learn how to create a double exposure effect in Adobe Photoshop.
Double exposure is a photographic technique in which two images are captured and combined into a single image. This effect can be used on movie posters , magazine and book covers.
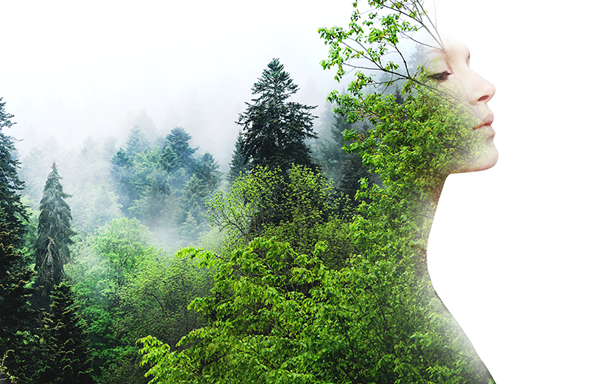
double exposure photoshop
Double exposure photoshop


Aplikasi : Adobe photoshop CS 6
Time : 30 minutes


Bahan:
Female model
triberg-837950_1920 

Create Double Exposue effect in photoshop
 
Step 1
Open photoshop in your computer and then Create new document in photoshop.
Go to file-new or Press Ctrl+N on keyboard.
Set the document with these settings:
Weight : 2500 Pixels
Height :1600 Pixels
Resolution : 72 Pixels/Inch
double exposure, photo effect


Step 2
Open female model picture in photoshop by way of select file-open.
Use pen tool (P) with path mode and then make selection at this picture.

double exposure, photo effect

Right click on path and select make selection.
Set feather selection to 1 pixels.

double exposure, photo effect

Step 3
Enable Move tool (V) then drag it to the main worksheet
Change the image size by pressing Ctrl + T on the keyboard to activate the transform menu .
double exposure, photo effect

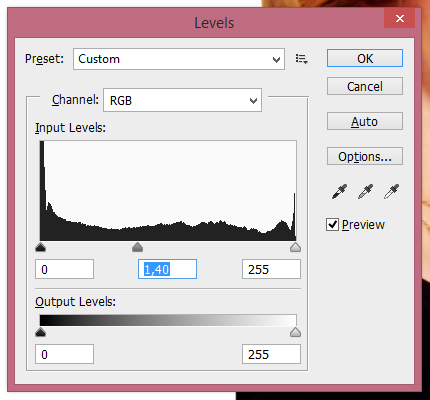
Set levels female model.
Go to Image-Adjusment-Levels or press Ctrl+L on keyboard.
Set level with these settings:
double exposure, photo effect

Set also Curves for this layer.
Select Image-Adjusment-Curves or press Ctrl+M on your keyboard.
Set Curves like this image above.
double exposure, photo effect

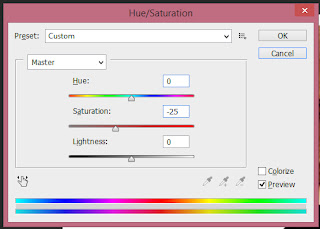
Go to Image-Adjusment-Hue/saturation or press Ctrl+U di keyboard.
Set Saturation to -25.
double exposure, photo effect

Step 4
Open triberg-837950_1920 image in photoshop.
Resize this image with transform menu (Ctrl+T), and adjust position of the image as shown below.
double exposure, photo effect

Step 5
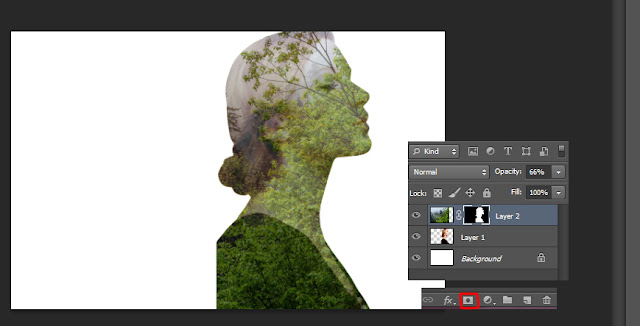
Make selection for layer 1(female model).
Press Ctrl + left klik on layer .
double exposure, photo effect

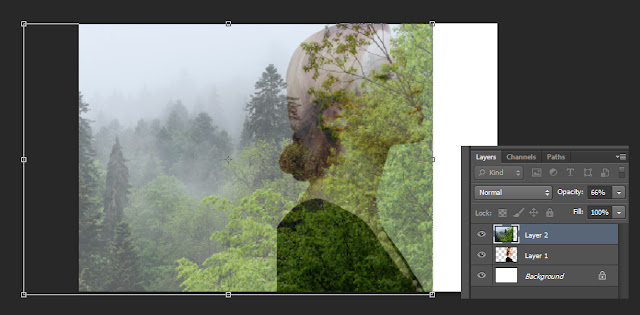
Go to triberg layer atau layer 2.
Add layer mask for this layer by clicking the icon add layer mask
Set the opacity layer to 66 %.
It will look like the image below
double exposure, photo effect

Step 6
Use brush tool (B) with black colour and soft mode.
Brush on the back of the model . See the image below that we will brush broom with which I've circled in red transparent.
double exposure, photo effect

Add layer mask for layer of female (layer 1).
Activate the Brush tool ( B ) with white color and then brush on the rear part of the female body .
double exposure, photo effect

Go back to layer 2 and then brush again with the black brush .

double exposure, photo effect

Step 7
Set opacity for layer 1 : 80%
Set opacity for layer 2 : 90%

double exposure, photo effect

Step 8
Create new adjusment layer.
click the Adjusment layer icon at the bottom of layer box and select Brightness/Contrast.
Set contrast to 32.
double exposure, photo effect

Final.
After all of the steps we have done, we will get the final result as shown below.
double exposure tutorial

Until here this tutorial, I really do hope you've enjoyed this article and you can create double exposure effect in photoshop.
Hopefully this tutorial useful for us all .
If any questions and suggestions please leave a comment below this post .
Thank you

Wednesday, August 12, 2015

Create Glossy Text Effect in Photoshop

In this tutorial we will learn how to create Glossy text effect in Photoshop. This text effects often encountered in internet. I will show to you how to use layer styles for getting glossy text.
Below is the final result that we get.
glossy text effect, photoshop tutorial, text effect
Glossy Text Effect


Aplication: Adobe Photoshop CS6
Time : 15 Minutes

Create Glossy Text Effect in Photoshop
Step 1
Open photoshop in your computer and then Create new document in photoshop.
Go to file-new or Press Ctrl+N on keyboard.
Set the document with these settings:
Weight : 1000 Pixels
Height :800 Pixels
Resolution : 300 Pixels/Inch
glossy text effect, photoshop tutorial, text effect

Step 2
We will create background for this glossy text effect.
Add new layer and then use Gradient Tool (G), apply this tool like image below.

glossy text effect, photoshop tutorial, text effect

Drag the gradient tool from the middle to the bottom.
glossy text effect, photoshop tutorial, text effect

Step 3
Create the text using the font Century751 SeBd BT, the Size 50pt, and the color # ff0000.
I use Glossy text for this on this occasion.
glossy text effect, photoshop tutorial, text effect

Duplicate the text layer twice.
we get 3 layers: original layer, first copy and second copy.
glossy text effect, photoshop tutorial, text effect

Step 4
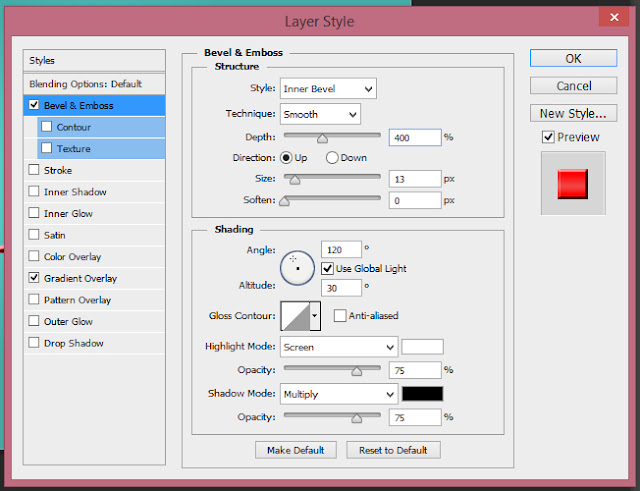
Double click the second copy text layer to apply the following layer style:
Add a Bevel and Emboss with these settings:

glossy text effect, photoshop tutorial, text effect

Add a Gradient Overlay with these settings:

glossy text effect, photoshop tutorial, text effect

Step 5
Double click the first copy (Glossy Copy), apply the following layer style :
Add a Bevel and Emboss with these settings:
glossy text effect, photoshop tutorial, text effect

Add a Stroke with these settings:
glossy text effect, photoshop tutorial, text effect

Step 6
Add outer glow layer style for original text (Glossy), with these settings:
glossy text effect, photoshop tutorial, text effect

Step 7
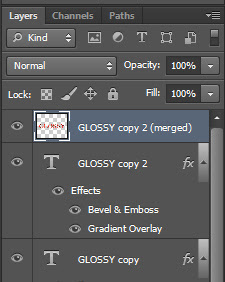
Select all layers of text, press Ctrl+Alt+E on keyboard, and we will get new layer (merged).
glossy text effect, photoshop tutorial, text effect

glossy text effect, photoshop tutorial, text effect

Step 8
Use move tool, drag layer merged to bottom of text glossy.
Press Ctrl+T on keyboard to use transform, Right click on transform select Flip Vertical then we wiil get result like this image.
glossy text effect, photoshop tutorial, text effect

Step 9
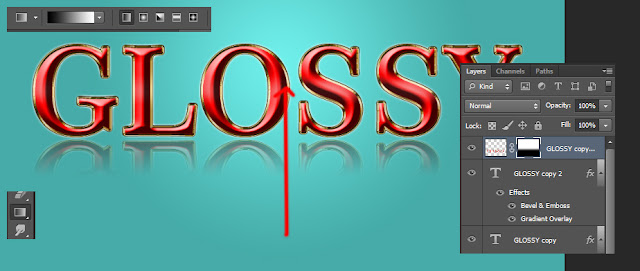
Click Icon add layer mask at the bottom layers box.
Pick gradient tool (G) with balck and white colour.
Drag this tool from the bottom to the top, this way to result highlight shadow like the text on the glass desk.
glossy text effect, photoshop tutorial, text effect

Congratulations! We're Done
The image below is final result this tutorial.
glossy text effect, photoshop tutorial, text effect

I hope this glossy text effect tutorial useful for us and please leave a comment for this post.
I'll see you at the next tutorial. Thank you.

Friday, August 7, 2015

how to create triangulation art in coreldraw

In this tutorial we will learn how to create triangulation art in coreldraw.
Triangulation or low poly is a technique of drawing an object of triangles. In this triangulation art tutorial, we will use an apple as object.
The image below is the final result we will get.
triangulation art, coreldraw tutorial, vector