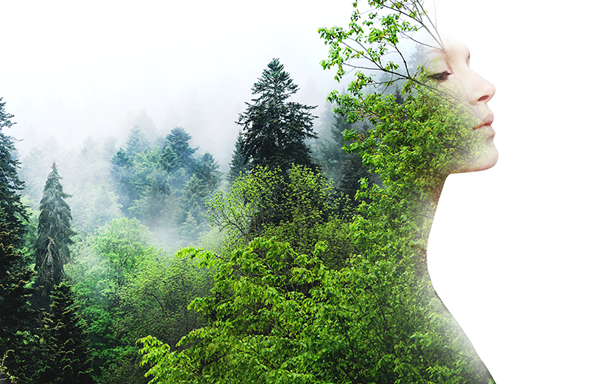
In this tutorial we will learn how to create a double exposure effect in Adobe Photoshop.
Double exposure is a photographic technique in which two images are captured and combined into a single image. This effect can be used on movie posters , magazine and book covers.
 |
| Double exposure photoshop |
Aplikasi : Adobe photoshop CS 6
Time : 30 minutes
Bahan:
Female model
triberg-837950_1920
Create Double Exposue effect in photoshop
Step 1
Open photoshop in your computer and then Create new document in photoshop.
Go to file-new or Press Ctrl+N on keyboard.
Set the document with these settings:
Weight : 2500 Pixels
Height :1600 Pixels
Resolution : 72 Pixels/Inch
Step 2
Open female model picture in photoshop by way of select file-open.
Use pen tool (P) with path mode and then make selection at this picture.
Right click on path and select make selection.
Set feather selection to 1 pixels.
Step 3
Enable Move tool (V) then drag it to the main worksheet
Change the image size by pressing Ctrl + T on the keyboard to activate the transform menu .
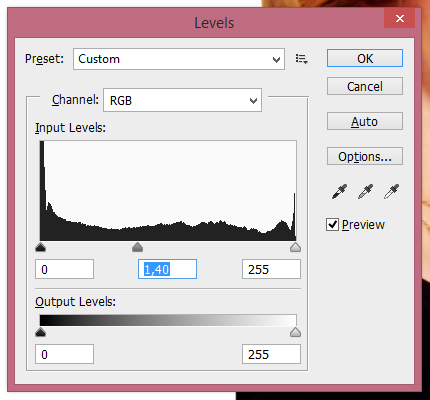
Set levels female model.
Go to Image-Adjusment-Levels or press Ctrl+L on keyboard.
Set level with these settings:
Set also Curves for this layer.
Select Image-Adjusment-Curves or press Ctrl+M on your keyboard.
Set Curves like this image above.
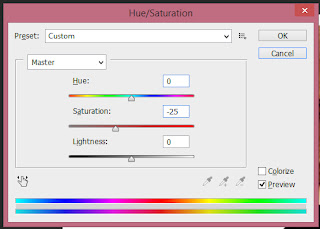
Go to Image-Adjusment-Hue/saturation or press Ctrl+U di keyboard.
Set Saturation to -25.
Step 4
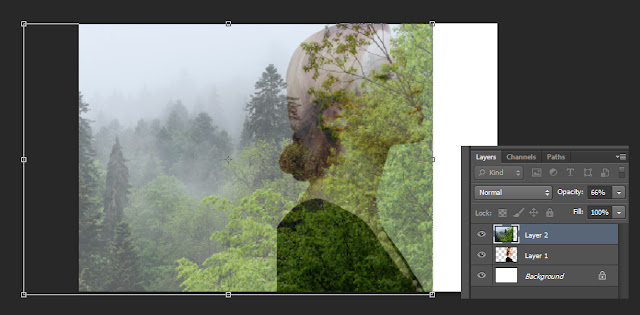
Open triberg-837950_1920 image in photoshop.
Resize this image with transform menu (Ctrl+T), and adjust position of the image as shown below.
Step 5
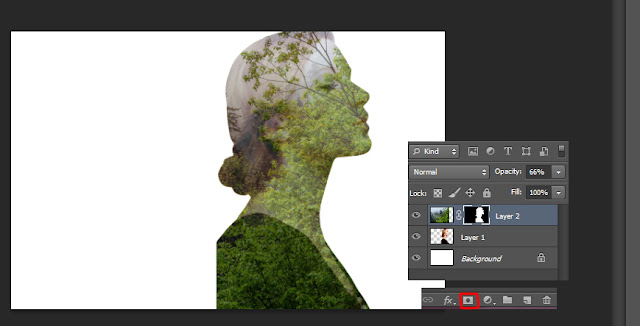
Make selection for layer 1(female model).
Press Ctrl + left klik on layer .
Go to triberg layer atau layer 2.
Add layer mask for this layer by clicking the icon add layer mask
Set the opacity layer to 66 %.
It will look like the image below
Step 6
Use brush tool (B) with black colour and soft mode.
Brush on the back of the model . See the image below that we will brush broom with which I've circled in red transparent.
Add layer mask for layer of female (layer 1).
Activate the Brush tool ( B ) with white color and then brush on the rear part of the female body .
Go back to layer 2 and then brush again with the black brush .
Step 7
Set opacity for layer 1 : 80%
Set opacity for layer 2 : 90%
Step 8
Create new adjusment layer.
click the Adjusment layer icon at the bottom of layer box and select Brightness/Contrast.
Set contrast to 32.
Final.
After all of the steps we have done, we will get the final result as shown below.
Until here this tutorial, I really do hope you've enjoyed this article and you can create double exposure effect in photoshop.
Hopefully this tutorial useful for us all .
If any questions and suggestions please leave a comment below this post .
Thank you






EmoticonEmoticon